How to Add Security Headers to WordPress Using Cloudflare Transform Rules
If you've ever run your WordPress site through securityheaders.com and gotten a D or F rating, you're not alone as security headers are one of the most forgotten aspects of WordPress development. Most WordPress sites ship with almost no security headers out of the box, and most hosting environments don't add them for you. That leaves your site exposed to cross-site scripting (XSS), clickjacking, MIME sniffing attacks, and a handful of other threats that are trivially preventable.
The good news: if your site is behind Cloudflare — even the free plan — you can add every recommended security header using Transform Rules without touching your server config, editing .htaccess, or installing an additional plugin that won't even provide that fix universally. The headers get applied at Cloudflare's edge, which means they work regardless of your hosting environment, don't add any PHP overhead, and won't get wiped out by a WordPress or plugin update.
This guide walks through each security header, what it does, and exactly how to set it all up in Cloudflare.
Why Add Security Headers at Cloudflare Instead of WordPress?
You can add security headers via PHP (header() calls in a must-use plugin), via .htaccess on Apache, or via Nginx config blocks. But there are practical reasons to do it at the Cloudflare level instead.
It's hosting-independent. If you migrate servers, switch from Apache to Nginx, or move from shared hosting to a VPS, your headers come with you. They live in Cloudflare, not in your server config.
No PHP execution required. Headers added in WordPress PHP only apply to requests that hit WordPress. Static assets (images, CSS, JS) served directly by the web server don't get the headers. Cloudflare applies them to every response including those that miss the edge cache.
No plugin dependency. Security plugins that add headers are yet another plugin to maintain, update, and hope doesn't conflict with anything. One fewer moving parts is always better especially when you factor in they aren't fully covering all assets.
Survives updates. Server config files and .htaccess can get overwritten. Cloudflare rules don't.
The only downside is that you need Cloudflare on your site. If you're running a WordPress site in 2026 and you're not using Cloudflare (or a comparable edge provider), that's a separate conversation worth having as I highly recommend using Cloudflare we do use it on every site we deploy (most on the free plan).
The Security Headers We're Going to Add
Here's the full set of headers we'll configure, and what each one protects against:
Content-Security-Policy (CSP) — Controls which resources (scripts, styles, images, fonts, frames) the browser is allowed to load. This is the most complex header but also the most impactful. It's your primary defense against XSS attacks.
Strict-Transport-Security (HSTS) — Tells browsers to only connect to your site over HTTPS. Once a browser sees this header, it won't even attempt an HTTP connection for the duration you specify. This prevents SSL stripping attacks and accidental insecure connections.
X-Content-Type-Options — Prevents browsers from MIME-sniffing a response away from the declared content type. Without this, a browser might interpret an uploaded file as executable code.
X-Frame-Options — Controls whether your site can be embedded in iframes on other domains. This is your defense against clickjacking. While Content-Security-Policy: frame-ancestors is the modern replacement, X-Frame-Options is still worth including for older browser support.
Referrer-Policy — Controls how much referrer information is sent when users click links on your site. Setting this properly protects your users' privacy and prevents URL-based data from leaking to third parties.
Permissions-Policy — Controls which browser features (camera, microphone, geolocation, payment, etc.) your site is allowed to use. Locking down features you don't use prevents any injected code from accessing them.
X-XSS-Protection — An older header that enabled the browser's built-in XSS filter. Modern browsers have largely deprecated this in favor of CSP, but setting it to 0 is now the recommended practice to avoid the security issues with the XSS auditor itself.
Step 1: Audit What Your Site Loads Before Building Your CSP
Every other header on this list is straightforward — set it and forget it. Content-Security-Policy is the exception. A CSP header that's too restrictive will break your site by blocking legitimate resources. A CSP header that's too permissive doesn't provide much protection. You need to know exactly what your site loads before writing the policy.
Open your site in Chrome, open DevTools (F12), go to the Network tab, and load a few representative pages — your homepage, a blog post, a contact page, and any page with forms or embedded content. For each request, note the domain it's loading from.
Sort through the list and group them by resource type. You're looking for:
Scripts (script-src) — JavaScript files and their source domains. Common ones include Google Tag Manager (www.googletagmanager.com), Google Analytics (www.google-analytics.com), Google reCAPTCHA (www.google.com, www.gstatic.com), Facebook Pixel (connect.facebook.net), and any CDNs you're pulling libraries from.
Styles (style-src) — CSS files and source domains. Google Fonts stylesheets come from fonts.googleapis.com. Many WordPress themes and plugins generate inline CSS, which means you'll likely need 'unsafe-inline' here.
Images (img-src) — Image sources. Gravatar uses secure.gravatar.com. If you're using a CDN or image optimization service, those domains need to be included. data: URIs are common for small inline images and icons.
Fonts (font-src) — Font file sources. Google Fonts serves actual font files from fonts.gstatic.com. If you self-host fonts (which you should for performance), you may only need 'self' here.
Frames (frame-src) — Anything loaded in an iframe. YouTube embeds come from www.youtube.com or www.youtube-nocookie.com. Google reCAPTCHA uses iframes from www.google.com. Vimeo uses player.vimeo.com.
Connections (connect-src) — Fetch/XHR requests. Analytics scripts send data to various endpoints. Google Analytics uses www.google-analytics.com, analytics.google.com, and stats.g.doubleclick.net. Please note: that you can't just whitelist the base Google Tag Manager calls you need to include all sub-calls for your analytics scripts, and pixels as well.
Write all of this down. You'll use it in Step 3.
Step 2: Set Up a Cloudflare Transform Rule
Log into your Cloudflare dashboard and select the domain you want to configure.
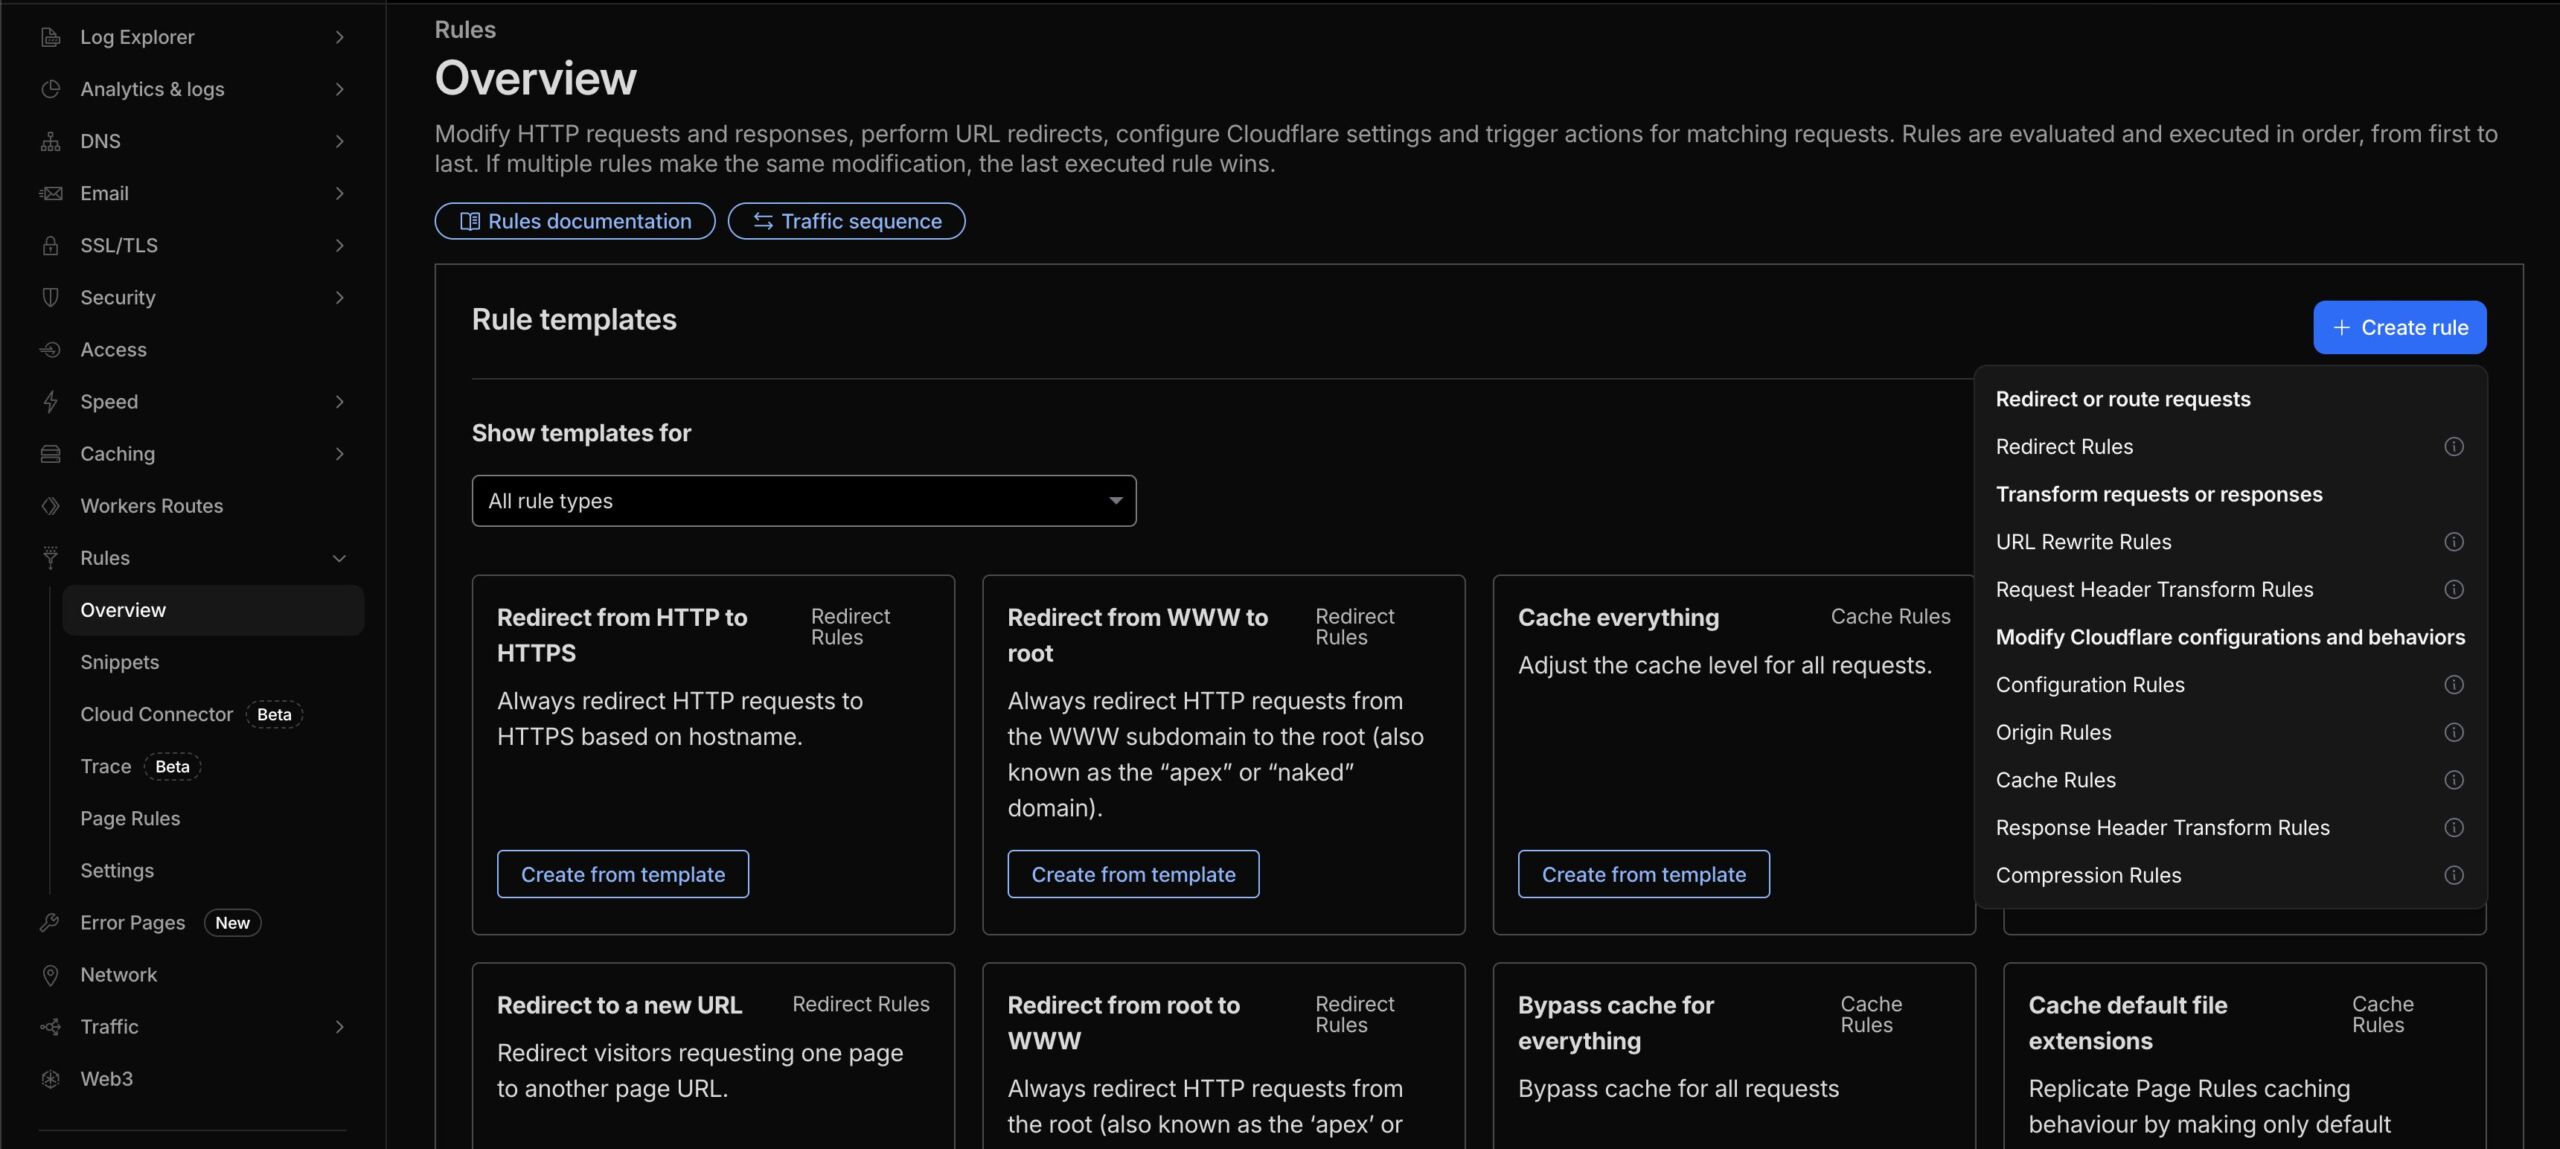
- In the left sidebar, navigate to Rules → Transform Rules
- Click the Response Header Transform Rules tab
- Click Create rule
- Give the rule a name — something like "Security Headers"
- Under When incoming requests match..., select All incoming requests
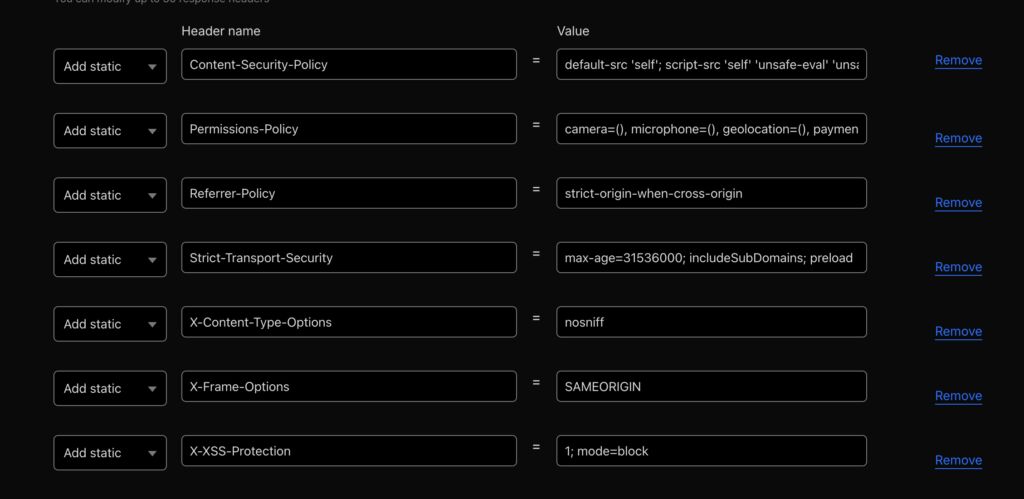
Now you're ready to add the headers. For each header below, click Add new header and set the operation to Set static (which means "add this header, replacing it if it already exists").
Step 3: Add Each Header
Here are the exact values to enter for each header. In the Cloudflare interface, you'll enter the Header name and the Value for each one. Note: You can setup HSTS under the SSL settings but for ease of maintenance I am going too include it here.
Strict-Transport-Security
Header name: Strict-Transport-Security
Value:
max-age=31536000; includeSubDomains; preload
This tells browsers to only use HTTPS for 1 year (31,536,000 seconds), applies to all subdomains, and signals that you'd like to be included in the browser HSTS preload list. Only include preload if your entire domain and all subdomains are fully HTTPS — the preload list is hard to get removed from once you're on it.
If you're not 100% certain all subdomains support HTTPS, start with:
max-age=31536000
X-Content-Type-Options
Header name: X-Content-Type-Options
Value:
nosniff
That's it. This is a simple on/off header. nosniff tells the browser to trust the declared MIME type and not try to guess. There's no reason not to set this on every site.
X-Frame-Options
Header name: X-Frame-Options
Value:
SAMEORIGIN
This allows your own site to iframe itself (which some plugins and admin features require) but prevents other domains from embedding your pages. If you absolutely never want your site in an iframe, even your own, use DENY instead.
Referrer-Policy
Header name: Referrer-Policy
Value:
strict-origin-when-cross-origin
This is the most balanced option. When navigating within your own site, the full URL is sent as the referrer. When navigating to a different site over HTTPS, only the origin (domain) is sent. When downgrading from HTTPS to HTTP, no referrer is sent at all.
Other acceptable options depending on your needs:
no-referrer— Never send referrer data. Maximum privacy but breaks some analytics and affiliate tracking.origin-when-cross-origin— Similar to strict-origin but also sends the origin on HTTPS→HTTP downgrades.
For most WordPress sites, strict-origin-when-cross-origin is the right choice. But my recommended option is no-referrer.
Permissions-Policy
Header name: Permissions-Policy
Value:
camera=(), microphone=(), geolocation=(), payment=(), usb=(), magnetometer=(), gyroscope=(), accelerometer=(), autoplay=(self), fullscreen=(self)
Empty parentheses () mean "disable this feature entirely." (self) means "only allow this feature on my own origin." This policy locks down hardware access and sensitive APIs that your site almost certainly doesn't need, while allowing autoplay (for background videos) and fullscreen (for embedded video players) on your own domain. If you use YouTube for your autoplaying video, i would omit autoplay entirely. If you use Google Maps for address lookup remove geolocation, and if you accept any form of payments on-site remove payment.
If your site uses geolocation (like a store locator), adjust accordingly:
camera=(), microphone=(), geolocation=(self), payment=(), usb=(), magnetometer=(), gyroscope=(), accelerometer=(), autoplay=(self), fullscreen=(self)
X-XSS-Protection
Header name: X-XSS-Protection
Value:
1; mode=block
Your actual XSS protection comes from Content-Security-Policy, which we're adding next.
Content-Security-Policy
Header name: Content-Security-Policy
This is where your audit from Step 1 comes in. The value depends entirely on what your site loads. Here's a realistic policy for a typical WordPress site running Google Analytics (via GTM), Google Fonts, Google reCAPTCHA, YouTube embeds, and Gravatar:
Value:
default-src 'self'; script-src 'self' 'unsafe-eval' 'unsafe-inline' https://www.googletagmanager.com https://www.google-analytics.com https://static.cloudflareinsights.com https://challenges.cloudflare.com https://www.google.com https://www.gstatic.com; style-src 'self' 'unsafe-inline' https://fonts.googleapis.com; img-src 'self' data: https://www.google-analytics.com https://secure.gravatar.com https://www.googletagmanager.com; font-src 'self' https://fonts.gstatic.com; frame-src https://www.youtube.com https://www.youtube-nocookie.com https://challenges.cloudflare.com https://www.google.com; connect-src 'self' https://www.google-analytics.com https://analytics.google.com https://stats.g.doubleclick.net; object-src 'none'; base-uri 'self'; form-action 'self'; frame-ancestors 'self'; upgrade-insecure-requestsWe have allowed 'unsafe-inline' in both our style-src and script-src directives. While removing 'unsafe-inline' from script-src provides the strongest protection against Cross-Site Scripting (XSS), it is fundamentally incompatible with how WordPress, WooCommerce, and most plugins operate. We accept this necessary compromise to keep the store functioning, while using the rest of the CSP to lock down unauthorized domains and object sources.
object-src 'none' blocks Flash and Java applets entirely. No modern site needs these.
base-uri 'self' prevents attackers from injecting a <base> tag that redirects all relative URLs.
form-action 'self' restricts where forms can submit data. This prevents an attacker from injecting a form that POSTs your users' data to an external server.
frame-ancestors 'self' is the modern replacement for X-Frame-Options. We're including both for compatibility.
upgrade-insecure-requests tells the browser to automatically upgrade any HTTP resource requests to HTTPS.
Adjust this for your site. If you're running WooCommerce with Stripe, add https://js.stripe.com to script-src and frame-src. Running the Facebook Pixel? Add https://connect.facebook.net to script-src and https://www.facebook.com to img-src and connect-src. Every third-party integration needs its domains whitelisted.
Step 4: Start with Report-Only (Recommended)
If you're not 100% confident your CSP allowlist covers everything, change just the CSP header name from Content-Security-Policy to Content-Security-Policy-Report-Only. This tells browsers to log violations in the console without actually blocking anything.
Deploy the rule, then browse your site with DevTools open. Check the Console tab for CSP violation reports. Each one will tell you exactly which resource was loaded from a source not in your policy. Add the missing domains, test again, and once you're seeing zero violations across all page types, switch the header name back to Content-Security-Policy to enforce.
The other headers (HSTS, X-Content-Type-Options, etc.) don't have a report-only mode and don't need one — they're safe to deploy immediately.
Step 5: Save and Deploy
Once all headers are added, scroll down and click Deploy. The rule takes effect within a few seconds since Cloudflare pushes changes to its edge network almost immediately.
Your rule should now show 7 headers being set:
- Strict-Transport-Security
- X-Content-Type-Options
- X-Frame-Options
- Referrer-Policy
- Permissions-Policy
- X-XSS-Protection
- Content-Security-Policy (or Content-Security-Policy-Report-Only)
Step 6: Verify Everything
Open your site in a new incognito window. Open DevTools, go to the Network tab, click on the document request (the first HTML request), and check the Response Headers section. You should see all seven headers.
Then run your site through these two tools:
securityheaders.com — Enter your URL and it'll give you a letter grade. With all seven headers properly configured, you should score an A or A+.
csp-evaluator.withgoogle.com — Paste your CSP value here. Google's tool will flag any weaknesses in your policy, like overly broad wildcard sources or missing directives I will highlight though achieving a perfect score on this tool can be quite difficult and I recommend using securityheaders.com as its more lenient and easier to understand for non-developers.
Handling Common WordPress Complications
WooCommerce checkout. Payment gateways like Stripe, PayPal, and Square each load scripts and iframes from their own domains. If you run WooCommerce, test the checkout flow thoroughly with DevTools open. Common domains you'll need to whitelist:
- Stripe:
js.stripe.com(script-src, frame-src),api.stripe.com(connect-src) - PayPal:
www.paypal.com(script-src, frame-src),www.sandbox.paypal.com(for testing) - Square:
js.squareupscdn.com(script-src),connect.squareupscdn.com(connect-src)
Page builders. If you're using Elementor, Beaver Builder, WPBakery, or similar, the front-end rendering typically uses inline styles (already covered by 'unsafe-inline' in style-src). But the editor itself — which loads on the front end when you're logged in — will likely need additional allowances. This is another good reason to exclude admin and logged-in editing sessions from the strict CSP.
Google reCAPTCHA v3. This is a common source of CSP violations because it loads scripts dynamically. Make sure you have https://www.google.com and https://www.gstatic.com in script-src, https://www.google.com in frame-src, and https://www.google.com in connect-src.
Tracking Pixels. These take the most effort the more pixels you use, the more you have to whitelist I recommend you use the monitor to get a feel for what you have.
One Rule, Every Response
That's all! One Cloudflare Transform Rule, seven headers, and your site goes from an F to an A on security headers. No plugins, no server config, no PHP overhead. It works on every hosting platform, survives every WordPress update, and takes about 10 minutes to set up.
The CSP portion takes the most thought because every site loads different third-party resources. Start with report-only mode, monitor for a few days, and tighten your policy based on what you see. The other six headers can be deployed immediately with the exact values listed above.
If you've been putting this off because it seemed complicated, now you know how to get it setup easily in Cloudflare.

Scott Hartley
Founder & CEO, Sert Media
Founder and CEO of Sert Media, a Nashville-based digital marketing agency. Scott has spent over 15 years helping businesses grow through SEO, web performance optimization, and strategic digital marketing. His deep expertise in WordPress development, site speed, and technical SEO has guided hundreds of brands toward measurable results. When he's not auditing Core Web Vitals or refining campaign strategies, he's writing about the tools, techniques, and trends shaping the modern web.
Related Articles

Use This Cloudflare Rule To Reduce Plugin Hack Attempts
Cloudflare Firewall Rules give you a lot of flexibility in further protecting your website. Here…
Set Up Cloudflare's Automatic Platform Optimization Feature
Automatic Platform Optimization (APO) is a new feature from Cloudflare that allows you to cache…
How To Fix Broken Themes And Plugins On WordPress 5.5
Has the recent WordPress 5.5 update caused issues for you on your website? You're not…
1 Comment
没想到通过Cloudflare的Transform Rules可以这么方便地添加安全头,解决WordPress默认缺失问题真的很有用!